![[Qt] QHBoxLayout, QVBoxLayout, QGridLayout](https://3001ssw.com/wp-content/uploads/2026/01/blog_main_banner4.png)
이번 글에서는 Layout에 대해 알아보겠습니다.
레이아웃은 Qt에서 GUI 프로그래밍을 할 때 위젯들을 배치하거나, 크기를 동적으로 변경하기 위해 사용되는 방법입니다.
레이아웃은 QHBoxLayout(수평), QVBoxLayout(수직), QGridLayout(그리드)가 있으며 각각의 사용법에 대해 알아보겠습니다.
QWidget::setLayout
우선 위젯을 하나 만든 뒤 아래와 같이 QVBoxLayout을 하나 생성한 뒤 setLayout 함수를 호출하여 VBox Layout으로 설정해줍니다.
#include "widget.h"

#include <QVBoxLayout>

Widget::Widget(QWidget *parent)
    : QWidget(parent)
{
    QVBoxLayout *defaultLayout = new QVBoxLayout();

    setLayout(defaultLayout);
}

Widget::~Widget()
{
}
setLayout 함수는 현제 위젯의 레이아웃을 설정합니다.
QHBoxLayout
QHBoxLayout은 이름에서 알 수 있듯이 수평으로 위젯을 배치할 수 있는 레이아웃입니다.
아래와 같이 한 주의 요일을 표시하는 label을 수평으로 배치해보겠습니다.

아래 코드처럼 QLabel을 동적으로 생성해 줍니다.
// HBox layout
QHBoxLayout *hBoxLayaout = new QHBoxLayout();
const int hCount = 7;
QString strWeek[hCount] = {"monday", "tuesday", "wendesday", "thursday", "Friday", "saturdaty", "sunday"};
for (int i = 0 ; i < hCount ; i ++)
{
    QLabel *pLabel = new QLabel(strWeek[i]);
    hBoxLayaout->addWidget(pLabel);
}
defaultLayout->addLayout(hBoxLayaout);
QVBoxLayout
QVBoxLayout은 수평으로 위젯을 배치하는 레이아웃 입니다. QHBoxLayout과 사용법이 같습니다.
// VBox Layout
QVBoxLayout *vBoxLayout = new QVBoxLayout();
const int vCount = 5;
QString strNumber[vCount] = {"one", "two", "three", "four", "five"};
for (int i = 0 ; i < vCount ; i ++)
{
    QPushButton *pButton = new QPushButton(strNumber[i]);
    vBoxLayout->addWidget(pButton);
}
defaultLayout->addLayout(vBoxLayout);
QHBoxLayout 하단에 위 코드를 추가해줍니다.
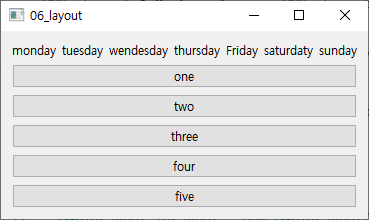
그러면 위와 같이 버튼 5개가 수직으로 추가된 것을 볼 수 있습니다.
QGridLayout
QGridLayout은 그리드 모양으로 위젯을 배치할 수 있는 레이아웃 입니다.
// Grid Layout
QGridLayout *gLayout = new QGridLayout();
const int gCount = 5;
QString strCount[gCount] = {"하나", "둘", "셋", "넷", "다섯"};
for (int i = 0 ; i < gCount ; i ++)
{
    QPushButton *pButton = new QPushButton(strNumber[i]);
    QLabel *pLabel = new QLabel(strWeek[i]);
    gLayout->addWidget(pButton, i, 0);
    gLayout->addWidget(pLabel, i, 1);
}
QPushButton *pButton = new QPushButton("여섯");
gLayout->addWidget(pButton, 6, 0, 6, 2);
defaultLayout->addLayout(gLayout);
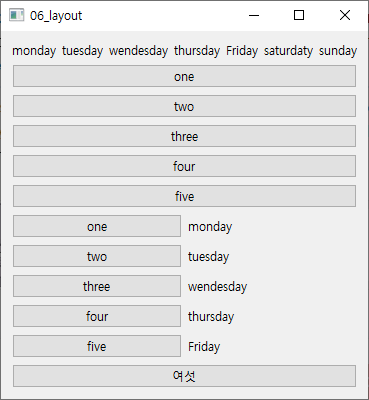
위 코드를 실행하면 아래와 같이 위젯을 배치합니다.
전체 코드
전체 코드는 아래와 같습니다.
#include "widget.h"

#include <QVBoxLayout>

#include <QHBoxLayout>
#include <QLabel>

#include <QPushButton>

#include <QGridLayout>

Widget::Widget(QWidget *parent)
    : QWidget(parent)
{
    QVBoxLayout *defaultLayout = new QVBoxLayout();

    // HBox layout
    QHBoxLayout *hBoxLayaout = new QHBoxLayout();
    const int hCount = 7;
    QString strWeek[hCount] = {"monday", "tuesday", "wendesday", "thursday", "Friday", "saturdaty", "sunday"};
    for (int i = 0 ; i < hCount ; i ++)
    {
        QLabel *pLabel = new QLabel(strWeek[i]);
        hBoxLayaout->addWidget(pLabel);
    }
    defaultLayout->addLayout(hBoxLayaout);

    // VBox Layout
    QVBoxLayout *vBoxLayout = new QVBoxLayout();
    const int vCount = 5;
    QString strNumber[vCount] = {"one", "two", "three", "four", "five"};
    for (int i = 0 ; i < vCount ; i ++)
    {
        QPushButton *pButton = new QPushButton(strNumber[i]);
        vBoxLayout->addWidget(pButton);
    }
    defaultLayout->addLayout(vBoxLayout);

    // Grid Layout
    QGridLayout *gLayout = new QGridLayout();
    const int gCount = 5;
    QString strCount[gCount] = {"하나", "둘", "셋", "넷", "다섯"};
    for (int i = 0 ; i < gCount ; i ++)
    {
        QPushButton *pButton = new QPushButton(strNumber[i]);
        QLabel *pLabel = new QLabel(strWeek[i]);
        gLayout->addWidget(pButton, i, 0);
        gLayout->addWidget(pLabel, i, 1);
    }
    QPushButton *pButton = new QPushButton("여섯");
    gLayout->addWidget(pButton, 6, 0, 6, 2);
    defaultLayout->addLayout(gLayout);

    setLayout(defaultLayout);
}

Widget::~Widget()
{
}