OpenCV에서는 영상 위에 직선을 그리는 lin), arrowedLine 함수를 제공합니다.
line
먼저 line함수부터 알아보겠습니다. line 함수의 원형은 아래와 같습니다.
/**
@param img 영상
@param pt1 시작점
@param pt2 끝점
@param color 라인 색상
@param thickness 라인 두께
@param lineType 라인의 타입
@param 그리기 좌표값의 축소 비율
 */
void line(InputOutputArray img, Point pt1, Point pt2, const Scalar& color, int thickness = 1, int lineType = LINE_8, int shift = 0);
라인의 타입은 아래와 같이 열거형 상수가 있습니다.
/** types of line
@ingroup imgproc_draw
*/
enum LineTypes {
    FILLED  = -1, // 직선 그리기에선 사용 안함
    LINE_4  = 4, // 4방향 연결
    LINE_8  = 8, // 8방향 연결
    LINE_AA = 16 // 안티에일리어싱
};
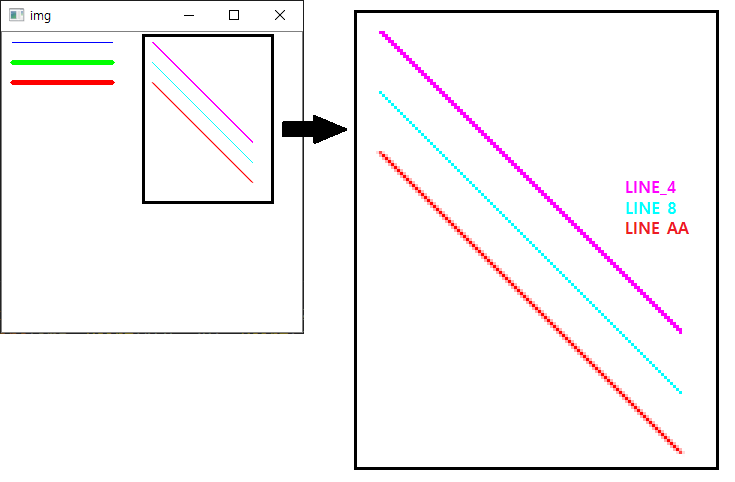
500 X 500 사이즈 영상에 색상과 두께를 다르게 한 3가지 직선을 그려보았습니다.
Mat img(500, 500, CV_8UC3, Scalar(255,255,255));
if (img.empty())
{
	cerr << "img open error" << endl;
	return -1;
}

line(img, Point(10, 10), Point(110, 10), Scalar(255, 0, 0), 1); // Blue
line(img, Point(10, 30), Point(110, 30), Scalar(0, 255, 0), 3); // Green
line(img, Point(10, 50), Point(110, 50), Scalar(0, 0, 255), 4); // Red

imshow("img", img);

waitKey();
destroyAllWindows();
위 코드를 실행하면 아래와 같이 표시됩니다.

아래 코드에서는 라인의 타입을 변경해보았습니다.
line(img, Point(150, 10), Point(250, 110), Scalar(255, 0, 255), 1, LINE_4);
line(img, Point(150, 30), Point(250, 130), Scalar(255, 255, 0), 1, LINE_8);
line(img, Point(150, 50), Point(250, 150), Scalar(0, 0, 255), 1, LINE_AA);
얼핏 보면 차이가 없어 보이지만 확대해서 볼 경우 각 타입별로 차이가 있습니다.

arrowedLine
다음으로 직선에 화살표를 그리는 arrowedLine 함수를 알아보겠습니다.
/**
@param img 영상.
@param pt1 시작점
@param pt2 끝점
@param color 라인 색상
@param thickness 라인 두께
@param line_type 라인의 타입
@param 그리기 좌표값의 축소비율
@param tipLength 전 직선 길이와 화살표길이의 비율
 */
void arrowedLine(InputOutputArray img, Point pt1, Point pt2, const Scalar& color, int thickness=1, int line_type=8, int shift=0, double tipLength=0.1);
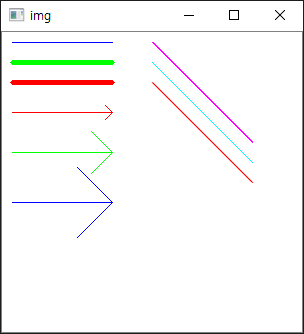
line 함수와 사용법이 비슷합니다. 아래는 arrowedLine 샘플 코드입니다.
arrowedLine(img, Point(10, 80), Point(110, 80), Scalar(0, 0, 255), 1, LINE_8, 0, 0.1);
arrowedLine(img, Point(10, 120), Point(110, 120), Scalar(0, 255, 0), 1, LINE_8, 0, 0.3);
arrowedLine(img, Point(10, 170), Point(110, 170), Scalar(255, 0, 0), 1, LINE_8, 0, 0.5);
실행 하면 아래와 같이 표시됩니다.

![[OpenCV] 직선 그리기 – line, arrowedLine](https://3001ssw.com/wp-content/uploads/2026/01/blog_main_banner4.png)