![[WPF] Database(SQLite) 사용해보기](https://3001ssw.com/wp-content/uploads/2026/01/blog_main_banner4.png)
이번 글에서는 local PC에 Database 파일을 만들고 데이터 저장, 화면 표시를 해보겠습니다. 데이터베이스는 Sqlite를 사용하도록 하겠습니다. 보통 DB 데이터를 select하거나 insert 하려면 SQL문법을 사용하는데, C#에서는 EF Core(Entity Framework Core)라는 ORM(Object-Relational Mapper)을 사용하면 SQL을 쓰지 않고 DB 데이터를 다룰 수 있습니다.
EF Core의 핵심적인 요소는 아래와 같습니다.
| 구성 요소 | 설명 |
|---|---|
| DbContext | 데이터베이스 세션을 나타내는 핵심 클래스 |
| DbSet<TEntity> | 데이터베이스의 특정 테이블과 1:1로 매핑되는 엔터티(Entity) 타입의 집합(Collection)을 나타내는 클래스 |
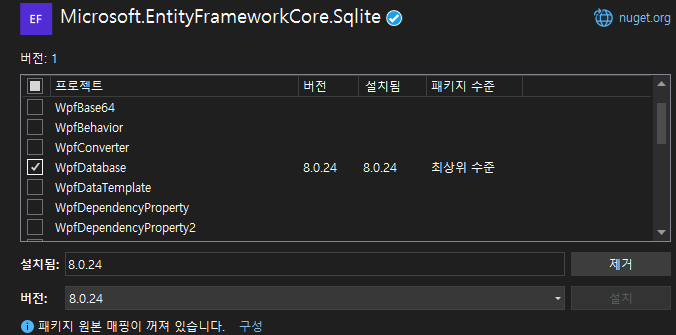
Sqlite 설치
우선 NuGet에서 Microsoft.EntityFrameworkCore.Sqlite를 설치해줍니다. 저는 .NET 8.0이므로 버전 8.0.24로 설치하였습니다. 닷넷 버전에 맞춰 설치 해야 합니다.
DbContext
위에서 설명한 것 처럼 Database 세션을 나타내는 DbContext를 상속 받는 클래스 AppDbContext.cs를 만들어 줍니다. 이 클래스에서 db 파일도 생성할 것이며 table도 생성 될 것입니다. 이 클래스에 DbSet<TEntity> 타입을 사용하여 속성을 선언하면 자동으로 TEntity에 맞는 테이블을 생성해줍니다. 이 글에서는 Student로 만들어 보겠습니다. 그리고 OnConfiguring 함수에서 데이터베이스를 구성하기 위해 메서드를 재정의 합니다.
public class AppDbContext : DbContext
{
    #region fields
    private SqliteConnectionStringBuilder? _sqliteBuilder = null; // sqlite
    #endregion

    #region Tables
    public DbSet<Student> Students { get; set; }
    #endregion

    public AppDbContext()
    {
    }

    protected override void OnConfiguring(DbContextOptionsBuilder optionsBuilder)
    {
        // 데이터베이스를 구성하기 위해 메서드 재정의
        if (_sqliteBuilder != null)
            optionsBuilder.UseSqlite(_sqliteBuilder?.ToString());
    }

    public void ConnectSqlite(string dbFilePath, SqliteOpenMode mode = SqliteOpenMode.ReadWriteCreate)
    {
        SqliteConnectionStringBuilder sqliteBuilder = new SqliteConnectionStringBuilder();
        sqliteBuilder.DataSource = dbFilePath;
        sqliteBuilder.Mode = mode;
        _sqliteBuilder = sqliteBuilder;

        Database.EnsureCreated();
        Students.Load();
    }

    public void CloseSqlite()
    {
        var connection = Database.GetDbConnection() as SqliteConnection;
        if (connection != null)
            SqliteConnection.ClearPool(connection);
    }
}
그리고 ConnectSqlite와 CloseSqlite 함수를 통해 데이터베이스를 연결하고 종료합니다.
이 다음은, 위에서 나온 Student.cs를 아래와 같이 만들어 줍니다. 아이디, 이름, 학년 정보를 담고 있습니다.
public class Student
{
    public Guid Id { get; set; } = Guid.NewGuid();
    public string Name { get; set; } = "";
    public int Grade { get; set; } = 0;
}
여기까지 만들었으면 데이터베이스 코드는 대략적으로 완성 되었습니다.
UI
MainWindowView.xaml에서는 아래와 같이 만들어줍니다.
<Window x:Class="WpfDatabase.MainWindow"
        xmlns="http://schemas.microsoft.com/winfx/2006/xaml/presentation"
        xmlns:x="http://schemas.microsoft.com/winfx/2006/xaml"
        xmlns:d="http://schemas.microsoft.com/expression/blend/2008"
        xmlns:mc="http://schemas.openxmlformats.org/markup-compatibility/2006"
        xmlns:local="clr-namespace:WpfDatabase"
        mc:Ignorable="d"
        Title="MainWindow"
        Height="450"
        Width="1000">
    <Window.DataContext>
        <local:MainViewModel/>
    </Window.DataContext>
    <Grid>
        <Grid.RowDefinitions>
            <RowDefinition Height="Auto"/>
            <RowDefinition Height="Auto"/>
            <RowDefinition Height="1*"/>
        </Grid.RowDefinitions>
        <!--#region status-->
        <Grid Grid.Row="0">
            <Grid.ColumnDefinitions>
                <ColumnDefinition Width="100"/>
                <ColumnDefinition Width="1*"/>
            </Grid.ColumnDefinitions>
            <TextBlock Grid.Column="0"
                       Margin="5"
                       TextAlignment="Right"
                       Text="Status: "/>
            <TextBlock Grid.Column="1"
                       Margin="5"
                       Text="{Binding Status}"/>
        </Grid>
        <!--  connection database  -->
        <Grid Grid.Row="1">

            <Grid.ColumnDefinitions>
                <ColumnDefinition Width="100"/>
                <ColumnDefinition Width="1*"/>
                <ColumnDefinition Width="100"/>
                <ColumnDefinition Width="100"/>
                <ColumnDefinition Width="100"/>
            </Grid.ColumnDefinitions>
            <TextBlock Grid.Column="0"
                       Margin="5"
                       TextAlignment="Right"
                       Text="Db File Path: "/>
            <TextBox Grid.Column="1"
                     Margin="5"
                     Text="{Binding DbFilePath}"/>
            <Button Grid.Column="2"
                    Margin="5"
                    Content="Connection"
                    Command="{Binding ConnectDbFilePathCommand}"/>
            <Button Grid.Column="3"
                    Margin="5"
                    Content="Close"
                    Command="{Binding CloseDbFilePathCommand}"/>
            <Button Grid.Column="4"
                    Margin="5"
                    Content="Save"
                    Command="{Binding SaveStudentCommand}"/>
        </Grid>
        <!--    -->

        <GroupBox Grid.Row="2"
                  Margin="5"
                  Header="Students">
            <DataGrid Margin="5"
                      ItemsSource="{Binding Students}"
                      AutoGenerateColumns="False"
                      IsReadOnly="False"
                      CanUserAddRows="True"
                      SelectionUnit="FullRow"
                      HeadersVisibility="Column"
                      VirtualizingStackPanel.ScrollUnit="Pixel"
                      VirtualizingStackPanel.VirtualizationMode="Recycling"
                      ScrollViewer.CanContentScroll="True">
                <DataGrid.Columns>
                    <DataGridTextColumn Header="Id"
                                        Width="Auto"
                                        IsReadOnly="True"
                                        Binding="{Binding Id}"/>
                    <DataGridTextColumn Header="Name"
                                        Width="1*"
                                        Binding="{Binding Name}"/>
                    <DataGridTextColumn Header="Grade"
                                        Width="1*"
                                        Binding="{Binding Grade}"/>
                </DataGrid.Columns>
            </DataGrid>
        </GroupBox>
    </Grid>
</Window>
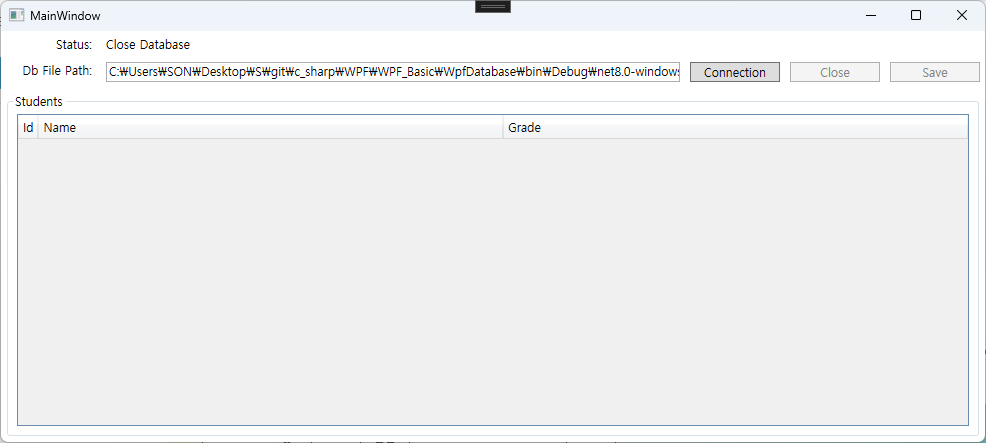
.db 파일 경로를 입력하고 Connection 버튼을 클릭하면 연결, Close 버튼을 클릭하면 연결해제, Save버튼을 누르면 수정된 사항 .db파일에 저장하는 기능을 가지고 있습니다.
MainViewModel.cs에는 아래와 같이 만들어줍니다.
public class MainViewModel : BindableBase
{
    #region fields, properties
    private AppDbContext? databaseContext = null;
    public AppDbContext? DatabaseContext { get => databaseContext; set => SetProperty(ref databaseContext, value); }

    private string status = "";
    public string Status { get => status; set => SetProperty(ref status, value); }

    private string dbFilePath = "";
    public string DbFilePath { get => dbFilePath; set => SetProperty(ref dbFilePath, value); }

    private ObservableCollection<Student>? students = null;
    public ObservableCollection<Student>? Students { get => students; set => SetProperty(ref students, value); }
    #endregion

    #region commands

    public DelegateCommand ConnectDbFilePathCommand { get; private set; }
    public DelegateCommand CloseDbFilePathCommand { get; private set; }
    public DelegateCommand SaveStudentCommand { get; private set; }

    private void OnConnectDbFilePath()
    {
        try
        {
            DatabaseContext = new AppDbContext();
            DatabaseContext.ConnectSqlite(DbFilePath);

            Students = DatabaseContext.Students.Local.ToObservableCollection();
            Status = "Connect Database";
        }
        catch (Exception e)
        {
            Status = "Connect Database Fail";
        }
        finally
        {
        }
    }

    private bool CanConnectDbFilePath()
        {
            if (DatabaseContext != null)
                return false;
            if (DatabaseContext == null)
            {
                if (string.IsNullOrEmpty(DbFilePath))
                    return false;
            }

            return true;
        }


    private void OnCloseDbFilePath()
        {
            DatabaseContext?.CloseSqlite();
            DatabaseContext?.Dispose();
            DatabaseContext = null;
            Status = "Close Database";

            Students = null;
        }

    private bool CanCloseDbFilePath()
        {
            if (DatabaseContext == null)
                return false;

            return true;
        }

    private void OnSaveStudent()
    {
        DatabaseContext?.SaveChanges();

        Status = "Save";
    }

    private bool CanSaveStudent()
    {
        if (DatabaseContext == null)
            return false;
        return true;
    }
    #endregion

    #region constructor
    public MainViewModel()
    {
        DbFilePath = Path.Combine(AppDomain.CurrentDomain.BaseDirectory, "School.db");

        ConnectDbFilePathCommand = new DelegateCommand(OnConnectDbFilePath, CanConnectDbFilePath).ObservesProperty(() => DatabaseContext); ;
        CloseDbFilePathCommand = new DelegateCommand(OnCloseDbFilePath, CanCloseDbFilePath).ObservesProperty(() => DatabaseContext); ;
        SaveStudentCommand = new DelegateCommand(OnSaveStudent, CanSaveStudent).ObservesProperty(() => DatabaseContext);
    }
    #endregion
}
실행하여 동작을 확인해봅니다.
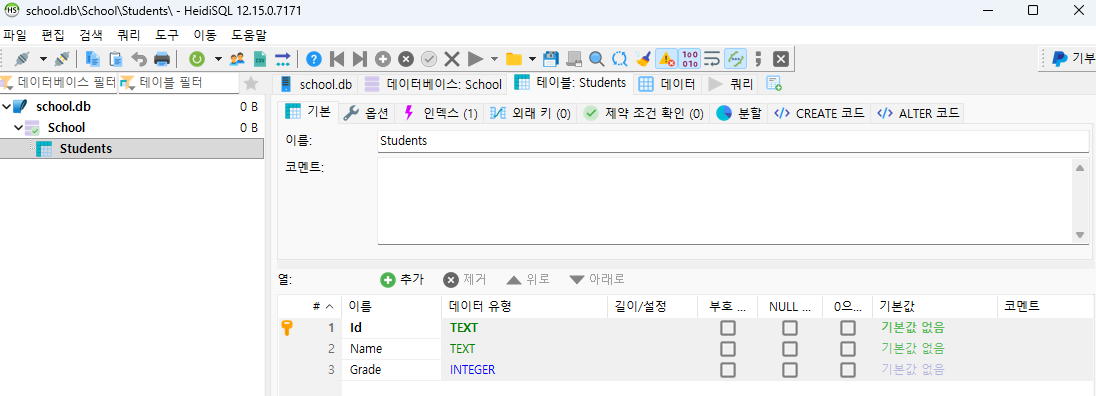
실제로 보면 해당 경로에 아래와 같이 School.db가 생성되어 있습니다.

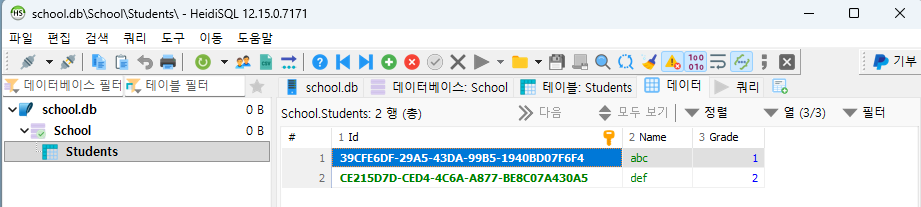
그리고 HeidiSQL로 열어보면 Students 테이블이 생성되어 있고, 칼럼도 만들어져 있으며, 입력한 내용이 들어있습니다.
테이블 특성
Student 클래스에서 몇 가지 속성을 넣으면 테이블 생성 시 더욱 기능이 풍부하게 만들 수 있습니다. 아래는 자주 사용되는 특성들 입니다.
테이블 및 칼럼 매핑에 사용되는 특성들 입니다.
| 특성 | 설명 |
|---|---|
| [Table(“이름”)] | 클래스를 특정 이름의 테이블로 매핑 |
| [Column(“이름”)] | 속성을 특정 이름의 컬럼으로 매핑 |
| [NotMapped] | DB 테이블 생성에서 제외 |
기본 키 및 값 생성에 관련된 특성입니다.
| 특성 | 설명 |
|---|---|
| [Key] | 해당 속성을 Primary Key로 설정 |
| [DatabaseGenerated] | 값이 생성되는 방식 설정 |
제약 조건 및 검증에 사용되는 특성입니다.
| 특성 | 설명 |
|---|---|
| [Required] | 필수 값 설정 (NOT NULL) |
| [MaxLength(n)] | 문자열/배열의 최대 길이 제한 |
| [StringLength(n)] | MaxLength와 비슷하지만 최소 길이도 지정 가능 |
| [Range(min, max)] | 숫자 데이터의 범위를 제한 |
관계 및 인덱스와 관련된 특성입니다.
| [ForeignKey(“이름”)] | 외래 키 관계 설정 |
| [Index] | 인덱스 생성 (검색 성능 향상) |
| [Timestamp] | 동시성 제어용 버전 관리 |
위 속성을 몇 개 사용해서 Student.cs를 다시 만들어 보면 아래와 같습니다.
[Table("TBL_STUDENT")]
public class Student
{
    [DatabaseGenerated(DatabaseGeneratedOption.None)]
    [Column("col_id")]
    [Key]
    public Guid Id { get; set; } = Guid.NewGuid();

    [Column("col_name")]
    public string Name { get; set; } = "";

    [Column("col_grade")]
    public int Grade { get; set; } = 0;

    [NotMapped] // 테이블에 칼럼 생기지 않음 안생김
    public string NotMapped { get; set; } = "";
}
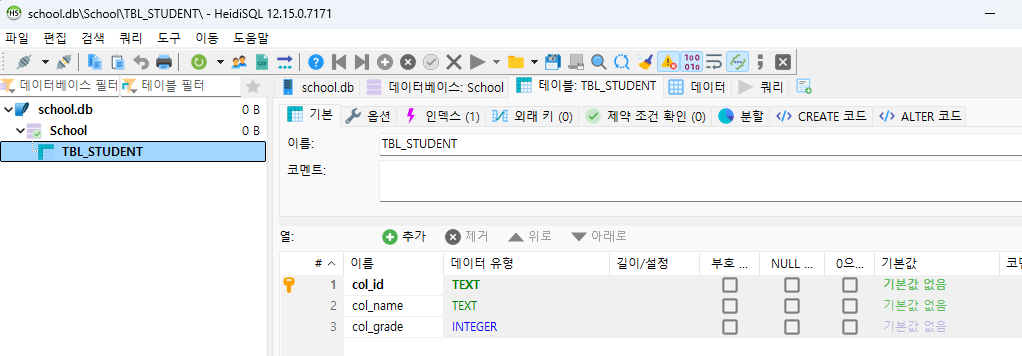
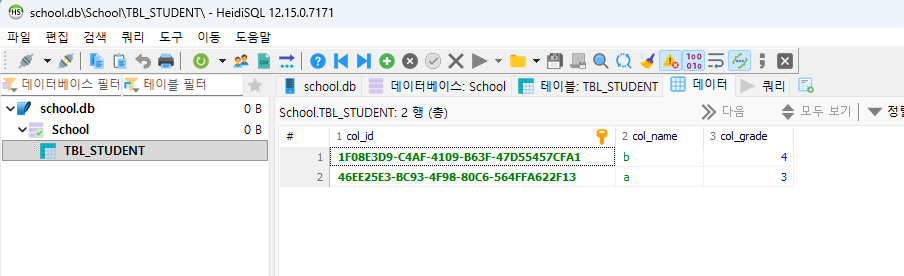
기존 School.db를 삭제하여 다시 프로그램을 실행하면 아래와 같이 테이블이 만들어진 것을 볼 수 있습니다.
이상으로 Sqlite를 사용해보았습니다.