![[OpenCV] 안드로이드 Native C++ 사용](https://3001ssw.com/wp-content/uploads/2026/01/blog_main_banner4.png)
이번글에서는 안드로이드 스튜디오에서 Native C++을 사용해보겠습니다.
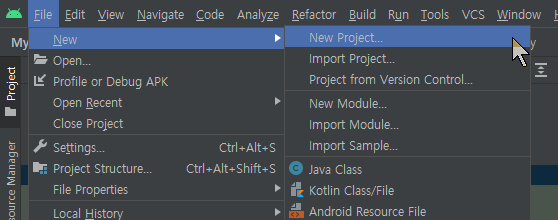
‘File’ – ‘New’ – ‘New Project’를 눌러 Native C++을 하나 생성해줍니다.

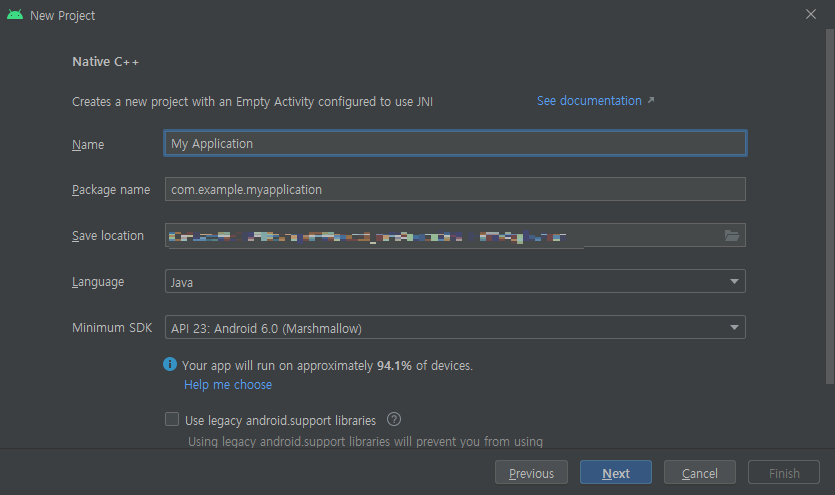
적당한 경로에 적당한 이름으로 만들어줍니다.
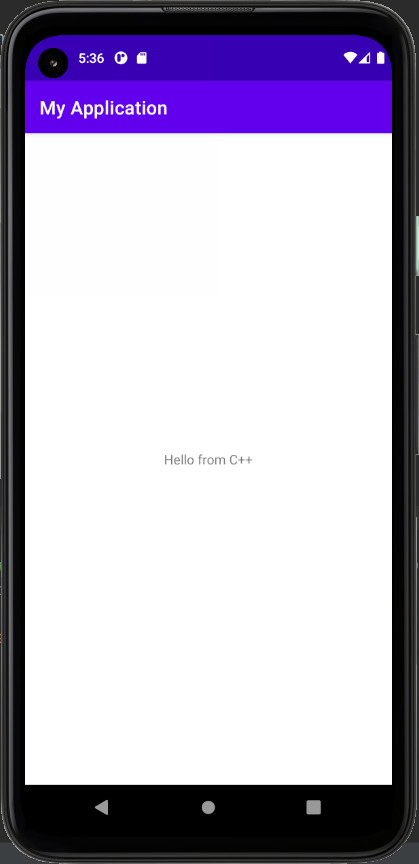
생성한 상태에서 바로 실행을 하게되면 아래와 같이 Hello From C++이라는 문구가 나타나게 됩니다.
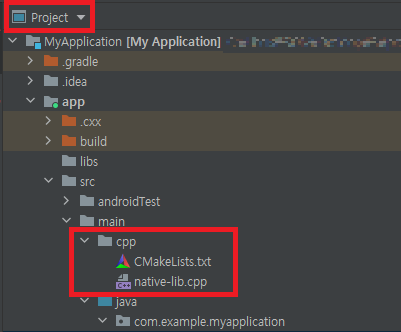
우선 코드를 입력하기 전에 프로젝트에서 어떤부분에 입력해야하는지 체크부터 해보겠습니다.
Navite C++로 프로젝트를 생성하게 되면 아래와 같이 MainActivity에 자동으로 loadLibrary와 stringFromJNI라는 함수가 생성됩니다.
public class MainActivity extends AppCompatActivity {

    // Used to load the 'myapplication' library on application startup.
    static {
        System.loadLibrary("myapplication"); // *** 라이브러리 로드
    }

    private ActivityMainBinding binding;

    @Override
    protected void onCreate(Bundle savedInstanceState) {
        super.onCreate(savedInstanceState);

        binding = ActivityMainBinding.inflate(getLayoutInflater());
        setContentView(binding.getRoot());

        // Example of a call to a native method
        TextView tv = binding.sampleText;
        tv.setText(stringFromJNI()); // *** 라이브러리 함수 호출
    }

    /**
     * A native method that is implemented by the 'myapplication' native library,
     * which is packaged with this application.
     */
    public native String stringFromJNI(); // *** 라이브러리 함수 정의
}
myapplication은 라이브러리, stringFromJNI는 라이브러리 함수입니다.
라이브러리와 함수에 대한 정의는 CMakeLists.txt와 native-lib.cpp에 보시면 찾으실 수 있습니다.
CMakeLists.txt에 이렇게 add_library가 되어 있는 부분이 있고
add_library( # Sets the name of the library.
        myapplication

        # Sets the library as a shared library.
        SHARED

        # Provides a relative path to your source file(s).
        native-lib.cpp)
native-lib.cpp에는 이렇게 함수가 정의 되어 있습니다.
#include <jni.h>
#include <string>

extern "C" JNIEXPORT jstring JNICALL
Java_com_example_myapplication_MainActivity_stringFromJNI(
        JNIEnv* env,
        jobject /* this */) {
    std::string hello = "Hello from C++";
    return env->NewStringUTF(hello.c_str());
}
위와 같이 맞춰서 코드를 입력해주도록 하겠습니다.
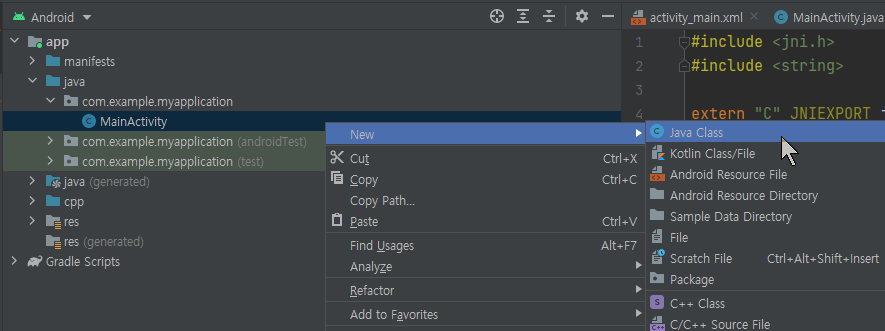
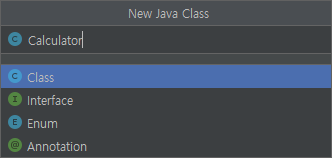
우선 Java 클래스를 하나 만들어 줍니다. 이름은 Calculator입니다.
Calculator 자바 클래스는 myMath 라이브러리를 로드하며 getSum 함수가 아래와 같이 있습니다.
package com.example.myapplication;

public class Calculator {
    static {
        System.loadLibrary("myMath");
    }
    public native int getSum(int num1, int num2);
}
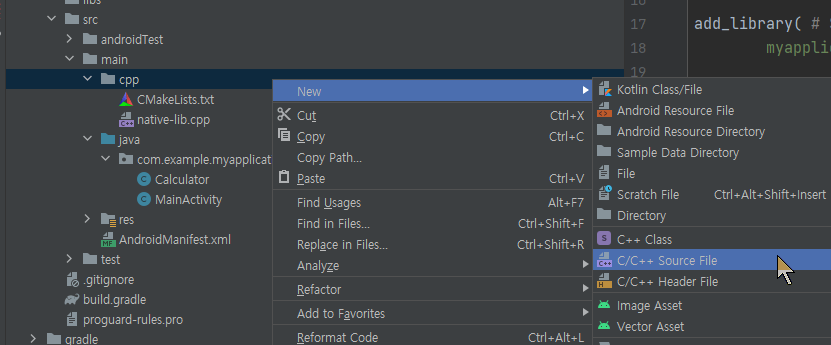
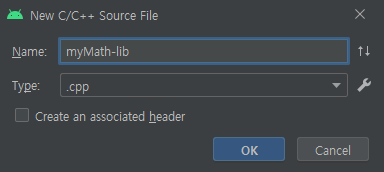
c++ 코드도 추가해줍니다. 이름은 myMath-lib.cpp로 하겠습니다.
JNI에 규칙에 맞춰 getSum 함수를 하나 만들어 줍니다.
JNI 규칙은 아래와 같습니다.
JAVA_(패키지명)_(클래스명)_(함수명)
myMath-lib.cpp에 아래와 같이 입력합니다.
#include <jni.h>

extern "C"
JNIEXPORT jint

JNICALL
Java_com_example_myapplication_Calculator_getSum(JNIEnv *env, jobject thiz, jint num1, jint num2) {
    // TODO: implement getSum()
    jint sum = num1 + num2;
    return sum;
}
CMakeLists.txt에 아래와 같이 add_library를 추가해줍니다.
add_library( # Sets the name of the library.
        myMath

        # Sets the library as a shared library.
        SHARED

        # Provides a relative path to your source file(s).
        myMath-lib.cpp)
그 다음으로 MainActivity에 아래와 같이 코딩합니다.
public class MainActivity extends AppCompatActivity {

    // Used to load the 'myapplication' library on application startup.
    static {
        System.loadLibrary("myapplication");
    }

    private ActivityMainBinding binding;
    private Calculator calculator = new Calculator();

    @Override
    protected void onCreate(Bundle savedInstanceState) {
        super.onCreate(savedInstanceState);

        binding = ActivityMainBinding.inflate(getLayoutInflater());
        setContentView(binding.getRoot());

        // Example of a call to a native method
        TextView tv = binding.sampleText;
        tv.setText(stringFromJNI());

        tv.setText("1 + 2 = " + calculator.getSum(1, 2));
    }

    /**
     * A native method that is implemented by the 'myapplication' native library,
     * which is packaged with this application.
     */
    public native String stringFromJNI();
}
실행해서 확인해보면 아래와 같이 실행 됩니다.

Native C++로 프로젝트를 만들면 쉽게 C++을 포함하여 사용할 수 있습니다.
만약 라이브러리에 다른 h파일이나 cpp 파일을 추가하고 싶으면 CMakeLists.txt에 아래와 같이 추가하면 됩니다.
add_library( # Sets the name of the library.
        myMath

        # Sets the library as a shared library.
        SHARED

        # Provides a relative path to your source file(s).
        myMath-lib.cpp
        Calculator.h
        Calculator.cpp)