![[C#] DataRow, DataTable, DataSet](https://3001ssw.com/wp-content/uploads/2026/01/blog_main_banner4.png)
개요
이번 글에서는 데이터 관리를 위한 클래스 DataRow, DataTable, DataSet에 대해 알아보겠습니다. DataRow, DataTable, DataSet은 System.Data 네임스페이스에서 제공하는 클래스이며 데이터 관리를 위한 핵심적인 클래스입니다. 이 클래스들은 주로 데이터를 다룰 때 많이 사용됩니다.
각 클래스를 간단하게 정리하면 아래와 같습니다.
| 클래스 | 설명 |
|---|---|
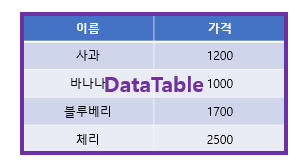
| DataRow | DataTable의 한 행을 나타냄 |
| DataTable | 테이블 단위의 데이터를 저장, 관리 함 |
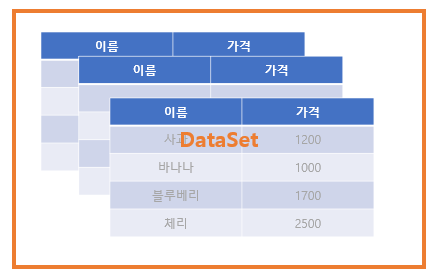
| DataSet | 여러 개의 DataTable을 포함하는 컨테이너 |
각 클래스를 이미지로 표현하면 아래와 같습니다.

DataRow, DataTable, DataSet 사용 예제
실제 예제를 통해서 사용하는 방법을 알아보겠습니다. 위 이미지 예시처럼 과일 정보를 담는 DataTable을 만들어보겠습니다.

DataTable을 생성하는 코드입니다. 데이터 테이블 이름은 Fruit으로 설정합니다.
DataTable dtFruit= new DataTable("Fruit");
과일의 이름(Name)과 가격(Price) 의미하는 칼럼을 추가하겠습니다. 칼럼 이름 뒤에 데이터 테이블에서 사용되는 타입을 입력합니다.
dtFruit.Columns.Add("Name", typeof(string));
dtFruit.Columns.Add("Price", typeof(int));
또는 아래와 같이 칼럼을 상세하게 입력 할 수 있습니다.
DataColumn colPrice = new DataColumn ();
colPrice.DataType = typeof(int);// 데이터 타입
colPrice.AllowDBNull = false; // Null 허용 여부
colPrice.Caption = "가격"; // 설명
colPrice.ColumnName = "Price"; // 칼럼명
colPrice.DefaultValue = int.Parse("0"); // 기본값

dtFruit.Columns.Add(colPrice);
그 다음 행(DataRow)을 추가하겠습니다. Row를 추가할 땐 table.Rows의 Add 함수를 사용 하거나 NewRow 함수를 통해 DataRow를 Add하는 방법이 있습니다.
// 방법 1
dtFruit.Rows.Add("Apple", 1200);
dtFruit.Rows.Add("Banana", 1000);
dtFruit.Rows.Add("Blueberry", 1700);

// 방법 2
DataRow rowCherry = dtFruit.NewRow();
rowCherry["Name"] = "Cherry";
rowCherry["Price"] = 2500;
dtFruit.Rows.Add(rowCherry);

DataRow rowMelon = dtFruit.NewRow();
rowMelon["Name"] = "Melon";
rowMelon["Price"] = 3000;
dtFruit.Rows.Add(rowMelon);
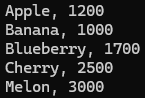
데이터를 조회하는 방법은 아래와 같습니다.
foreach (DataRow row in dtFruit.Rows)
{
    Console.WriteLine($"{row["Name"]}, {row["Price"]}");
}
행을 삭제하는 방법은 RemoveAt 함수를 사용하여 삭제하는 방법과 Remove 함수를 사용하는 방법이 있습니다. RemoveAt은 인덱스, Remove는 DataRow 객체로 삭제합니다.
dtFruit.Rows.RemoveAt(4); // 인덱스로 삭제
dtFruit.Rows.Remove(rowMelon); // DataRow로 삭제
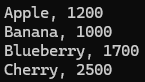
Select 함수를 사용하면 특정 조건으로 검색할 수 있습니다.
DataRow[] result = dtFruit.Select("Price > 1500");
foreach (DataRow row in result)
{
    Console.WriteLine($"{row["Name"]}, {row["Price"]}");
}

DataTable에 입력된 데이터를 XML로 저장하려면 WriteXml 함수를 사용하면 됩니다.
dtFruit.WriteXml("Fruit.xml");
실행되는 폴더에 보면 Fruit.xml 파일이 생긴 것을 볼 수 있습니다.

<?xml version="1.0" standalone="yes"?>
<DocumentElement>
  <Fruit>
    <Name>Apple</Name>
    <Price>1200</Price>
  </Fruit>
  <Fruit>
    <Name>Banana</Name>
    <Price>1000</Price>
  </Fruit>
  <Fruit>
    <Name>Blueberry</Name>
    <Price>1700</Price>
  </Fruit>
  <Fruit>
    <Name>Cherry</Name>
    <Price>2500</Price>
  </Fruit>
</DocumentElement>
반대로 XML을 읽어오려면 ReadXml 함수를 사용하시면 됩니다.
dtFruit.ReadXml("Fruit.xml"); // xml 읽기
DataTable의 모든 행을 삭제하려면 Clear 함수를 사용합니다.
dtFruit.Clear();
DataSet에서도 간단히 알아보겠습니다. 위 이미지에서 설명 드린 것처럼 여러 개의 DataTable을 포함하는 컨테이너 입니다.
데이터베이스처럼 여러 개의 테이블을 포함 및 관리할 수 있습니다.

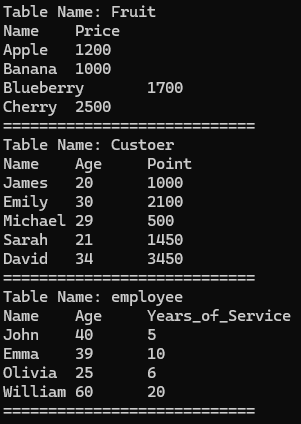
마트(mart)를 의미하는 DataSet을 만든 뒤 과일(Fruit)과 고객(Custoer), 직원(Employee) 테이블을 입력한 뒤 출력해보겠습니다.
// 고객 테이블 생성
DataTable dtCustomer = new DataTable("Custoer");
dtCustomer.Columns.Add("Name", typeof(string));
dtCustomer.Columns.Add("Age", typeof(int));
dtCustomer.Columns.Add("Point", typeof(int));
dtCustomer.Rows.Add("James", 20, 1000);
dtCustomer.Rows.Add("Emily", 30, 2100);
dtCustomer.Rows.Add("Michael", 29, 500);
dtCustomer.Rows.Add("Sarah", 21, 1450);
dtCustomer.Rows.Add("David", 34, 3450);

// 직원 테이블 생성
DataTable dtEmployee = new DataTable("employee");
dtEmployee.Columns.Add("Name", typeof(string));
dtEmployee.Columns.Add("Age", typeof(int));
dtEmployee.Columns.Add("Years_of_Service", typeof(int));
dtEmployee.Rows.Add("John", 40, 5);
dtEmployee.Rows.Add("Emma", 39, 10);
dtEmployee.Rows.Add("Olivia", 25, 6);
dtEmployee.Rows.Add("William", 60, 20);

//DataSet
DataSet ds = new DataSet("mart");
ds.Tables.Add(dtFruit);
ds.Tables.Add(dtCustomer);
ds.Tables.Add(dtEmployee);

// 전체 조회
foreach (DataTable table in ds.Tables)
{
    Console.WriteLine($"Table Name: {table.TableName}");
    foreach (DataColumn col in table.Columns)
    {
        Console.Write($"{col.ColumnName}\t");
    }
        Console.WriteLine();
    foreach (DataRow row in table.Rows)
    {
        foreach (DataColumn col in table.Columns)
        {
            Console.Write($"{row[col.ColumnName]}\t");
        }
        Console.WriteLine();
    }
    Console.WriteLine("============================");
}
실행 하면 아래와 같이 표시합니다.
마찬가지로 DataSet도 XML 파일로 저장 할 수 있습니다. 함수는 동일하게 WriteXml 입니다. XML 파일을 읽는 함수도 ReadXml 함수를 사용하시면 됩니다. 아래는 WriteXml 함수를 통해 저장된 mart.xml 파일 입니다.
ds.WriteXml("mart.xml");
<?xml version="1.0" standalone="yes"?>
<mart>
  <Fruit>
    <Name>Apple</Name>
    <Price>1200</Price>
  </Fruit>
  <Fruit>
    <Name>Banana</Name>
    <Price>1000</Price>
  </Fruit>
  <Fruit>
    <Name>Blueberry</Name>
    <Price>1700</Price>
  </Fruit>
  <Fruit>
    <Name>Cherry</Name>
    <Price>2500</Price>
  </Fruit>
  <Custoer>
    <Name>James</Name>
    <Age>20</Age>
    <Point>1000</Point>
  </Custoer>
  <Custoer>
    <Name>Emily</Name>
    <Age>30</Age>
    <Point>2100</Point>
  </Custoer>
  <Custoer>
    <Name>Michael</Name>
    <Age>29</Age>
    <Point>500</Point>
  </Custoer>
  <Custoer>
    <Name>Sarah</Name>
    <Age>21</Age>
    <Point>1450</Point>
  </Custoer>
  <Custoer>
    <Name>David</Name>
    <Age>34</Age>
    <Point>3450</Point>
  </Custoer>
  <employee>
    <Name>John</Name>
    <Age>40</Age>
    <Years_of_Service>5</Years_of_Service>
  </employee>
  <employee>
    <Name>Emma</Name>
    <Age>39</Age>
    <Years_of_Service>10</Years_of_Service>
  </employee>
  <employee>
    <Name>Olivia</Name>
    <Age>25</Age>
    <Years_of_Service>6</Years_of_Service>
  </employee>
  <employee>
    <Name>William</Name>
    <Age>60</Age>
    <Years_of_Service>20</Years_of_Service>
  </employee>
</mart>
github : https://github.com/3001ssw/c_sharp/tree/main/Data_Struct/Data